 Save to Pinterest
 My waffle iron had been collecting dust for months until a lazy Sunday morning when I realized I had leftover hash browns and a wedge of sharp cheddar that needed rescuing. I'd never thought to put potatoes in a waffle iron before, but something about the combination felt like it could work—crispy edges, creamy pockets of melted cheese, all the comfort of hash browns but in a form you could actually hold. That first batch came out golden and crackling, and I haven't looked back since.
I made these for my sister one morning after she complained about boring hotel breakfasts on her travels, and watching her eyes light up when she bit into one was worth every second. She texted me the recipe request before she'd even finished her coffee, and now they've become her go-to when she wants to feel like she's actually cooked something impressive at home.
Ingredients
- Frozen shredded hash browns (3 cups, thawed and patted dry): The key is really patting them dry—any excess moisture turns these soggy instead of crispy, so take an extra minute with paper towels and you'll taste the difference.
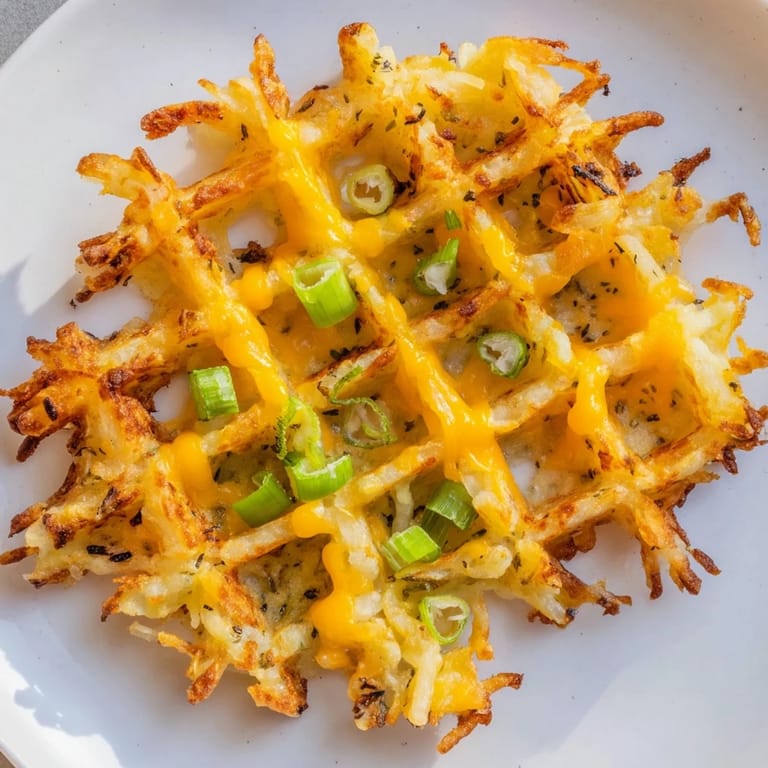
- Sharp cheddar cheese, shredded (1 cup): Sharp cheddar gives you that tangy bite that regular mild cheddar just can't match, and it doesn't turn greasy the way some softer cheeses do.
- Grated Parmesan cheese (¼ cup): This adds a salty, nutty depth that makes people ask what your secret ingredient is.
- Large eggs (2): These act as your binder—they're what holds everything together and keeps it from falling apart when you flip the waffle iron.
- Green onions, finely sliced (2): Fresh, grassy, and bright—they cut through all the richness and keep these from tasting one-note.
- All-purpose flour (¼ cup): Just enough to help structure everything without making them heavy or cake-like.
- Garlic powder and onion powder (½ teaspoon each): These aren't just filler—they deepen the savory flavor in a way fresh garlic or onion can't do since everything happens so fast in the iron.
- Salt and black pepper (½ teaspoon and ¼ teaspoon): Season generously here because these flavors are your foundation.
Tired of Takeout? 🥡
Get 10 meals you can make faster than delivery arrives. Seriously.
One email. No spam. Unsubscribe anytime.
Instructions
- Get your iron ready:
- Preheat your waffle iron and lightly coat it with nonstick spray or oil—this is non-negotiable if you want them to release cleanly. A dry iron will stick and tear, so don't skip this step even if your iron says it's nonstick.
- Mix everything together:
- Combine the hash browns, both cheeses, eggs, green onions, flour, and all your seasonings in one bowl and stir until it's well combined and slightly sticky. You want the mixture to hold together but still feel like potatoes, not like a batter.
- Fill and cook:
- Scoop about 1 cup of mixture onto the center of your hot iron, gently spread it out toward the edges, then close the lid. Most waffles take 5–7 minutes to turn golden and crispy, but your appliance might be faster or slower, so listen for the sizzling to quiet down and peek at the edges—that's your cue they're ready.
- Release with care:
- These waffles are sturdier than sweet ones, but ease them out gently with a spatula anyway. Let them cool on a plate for just a minute before serving, which lets them set up and get even crispier.
 Save to Pinterest
 There was a moment during a weekend brunch where I served these alongside eggs and toast, and my neighbor asked for thirds—and I realized these had somehow become more than just a breakfast convenience. They turned into the thing people asked about, the recipe that got texted to friends, the reason someone came over on a Sunday morning.
How to Customize Them
The beauty of these waffles is how forgiving they are to swap-outs and add-ins. I've made versions with pepper jack cheese when I want heat, swapped in mozzarella when someone mentions liking milder flavors, and crumbled bacon into the mix on mornings when I felt like being extra. Diced bell peppers add texture and sweetness, caramelized onions bring depth, or you could even try fresh jalapeños if you want real spice. The potatoes and eggs are your anchor—everything else can shift based on what you have or what mood you're in.
Serving Ideas That Work
These waffles are amazing on their own, but they really shine when you give them toppings that complement instead of compete with them. A dollop of sour cream is classic and cools down any spice, fresh chopped chives add brightness, and hot sauce or sriracha turns them into something almost like comfort food nachos. I've also served them alongside a simple salad for a light lunch, used them as a base for a breakfast sandwich with eggs and bacon, or just eaten them straight from the iron while they're still warm and the cheese is at peak gooey.
Storage and Reheating
These freeze beautifully if you ever happen to make extras, though honestly they rarely last long enough to freeze. Let any leftovers cool completely, stack them with parchment between layers so they don't stick together, then freeze them in a container for up to a month. When hunger hits, pop them straight into the toaster on medium heat and they'll crisp back up in about 3–4 minutes, tasting almost as good as fresh.
- Cool waffles completely before freezing or they'll release steam and get soggy.
- Reheat in a toaster, not the microwave, which will make them rubbery no matter how short you set it.
- These are proof that meal prep breakfast can actually be delicious and not feel like you're eating leftovers.
 Save to Pinterest
 These waffles have become my answer to anyone who says they don't have time for a real breakfast, because somehow a hot waffle iron and a few pantry staples can turn five minutes into something worth waking up for. That's the whole point, really.
Recipe Questions & Answers
- → How to ensure crispiness in hash brown waffles?
Dry the shredded potatoes thoroughly before mixing to prevent sogginess and achieve a crispier texture.
- → Can I substitute cheddar cheese with other types?
Yes, pepper jack or mozzarella work well and add unique flavors to the waffles.
- → Is it possible to freeze these waffles?
Absolutely, they freeze well. Reheat in a toaster or oven for quick, crispy results.
- → What spices enhance the flavor of these waffles?
Garlic powder, onion powder, salt, and black pepper create a balanced and savory profile.
- → What are good serving options for these waffles?
Serve warm with sour cream, chopped chives, or hot sauce for added zest and creaminess.