Save to Pinterest
 There's something magical about the week before St. Patrick's Day when the kitchen smells like butter and vanilla instead of the usual weeknight chaos. My neighbor stopped by one March afternoon asking if I'd made any green treats yet, and I realized I'd been making the same old boxed cookies for years. That conversation sparked an afternoon of experimenting with shamrock shapes and royal icing, turning what could've been a simple task into something genuinely festive and worth the extra effort.
I made these for a St. Patrick's Day potluck once and watched them disappear within the first ten minutes, which told me everything I needed to know. Someone's kid came back for thirds and asked if I'd made them by hand, and the pride in that moment made all the piping work worthwhile. That's when I knew this recipe wasn't just about cookies—it was about creating something people actually wanted to remember.
Ingredients
- All-purpose flour (2 1/2 cups): This is your foundation, and measuring by weight keeps your dough consistent every time rather than guessing with cups.
- Baking powder (1/2 teaspoon): Just enough lift to keep these tender without making them cakey or too puffy for clean cookie cutter shapes.
- Salt (1/4 teaspoon): This small amount doesn't make them taste salty—it actually brightens the vanilla and butter flavors.
- Unsalted butter (3/4 cup), softened: Soft butter creams properly with sugar, so pull it out of the fridge 30 minutes before starting.
- Granulated sugar (1 cup): The sweetness that makes these cookies feel festive without being overwhelming.
- Egg (1 large): Binds everything together and gives the cookies a slight lift during baking.
- Vanilla extract (1 teaspoon): Use real vanilla if you can—it makes a difference in the flavor profile.
- Almond extract (1/2 teaspoon, optional): This adds a subtle warmth that keeps the cookies from tasting one-dimensional, but honestly you won't miss it if you skip it.
- Powdered sugar (2 cups), sifted: Sifting removes lumps so your icing stays smooth and glossy without beating it to death.
- Meringue powder (2 tablespoons): This stabilizes the icing and lets it dry hard enough to stack without cracking.
- Water (3–4 tablespoons), room temperature: Cold water takes longer to incorporate; room temp gives you better control over consistency.
- Green gel food coloring: Gel is more concentrated than liquid, so you won't thin out your icing trying to get that rich green color.
Tired of Takeout? 🥡
Get 10 meals you can make faster than delivery arrives. Seriously.
One email. No spam. Unsubscribe anytime.
Instructions
- Mix the dry ingredients:
- Whisk flour, baking powder, and salt together in a medium bowl, then set it aside so you're not fumbling mid-dough. This simple step prevents lumps from hiding in your batter.
- Cream butter and sugar:
- Beat softened butter and sugar together for about 2 minutes until it looks pale and fluffy, which means air is incorporated and your cookies will have a tender crumb. You'll see the mixture transform from grainy to smooth and cloud-like.
- Add the wet ingredients:
- Beat in the egg, vanilla, and almond extract until everything is combined and you don't see any streaks of butter. This step takes less than a minute but matters for even mixing.
- Combine wet and dry:
- Gradually add the flour mixture to the butter mixture, mixing on low speed just until the dough comes together. Stop as soon as you don't see dry flour anymore—overmixing makes tough cookies.
- Chill the dough:
- Divide dough into two discs, wrap each in plastic wrap, and refrigerate for at least 1 hour so it's firm enough to roll and cut without sticking. You can also make the dough a day ahead if you're planning ahead.
- Prepare for baking:
- Preheat your oven to 350°F and line baking sheets with parchment paper so the bottoms don't brown too fast. This setup prevents you from scrambling when the dough is ready to go.
- Roll and cut:
- On a lightly floured surface, roll dough to 1/4-inch thickness and cut shamrock shapes, placing them 1 inch apart on the baking sheet. If the dough gets warm and sticky, pop it back in the fridge for 10 minutes.
- Bake until edges turn golden:
- Bake for 8–10 minutes until just the edges begin to turn golden brown, which means the centers stay soft. The cookies will continue cooking slightly after you pull them out, so don't wait for the whole thing to brown.
- Cool properly:
- Let cookies sit on the pan for 5 minutes to set slightly, then transfer to a wire rack to cool completely so the icing doesn't slide off warm cookies. This waiting period tests your patience but it's worth it.
- Make the royal icing:
- Combine sifted powdered sugar and meringue powder, add water and vanilla, then beat on low for 5–7 minutes until the mixture is smooth and glossy. You'll hear the mixer quiet down when it's reached the right consistency.
- Color the icing:
- Add green gel food coloring a tiny bit at a time, mixing between additions so you don't overshoot and end up with forest green when you wanted spring green. Gel coloring is potent, so restraint pays off here.
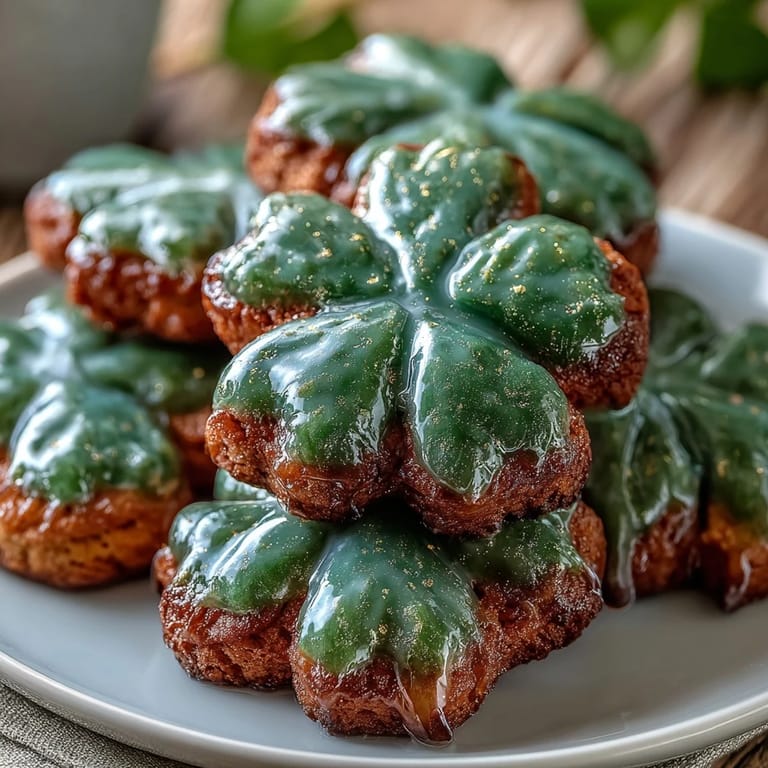
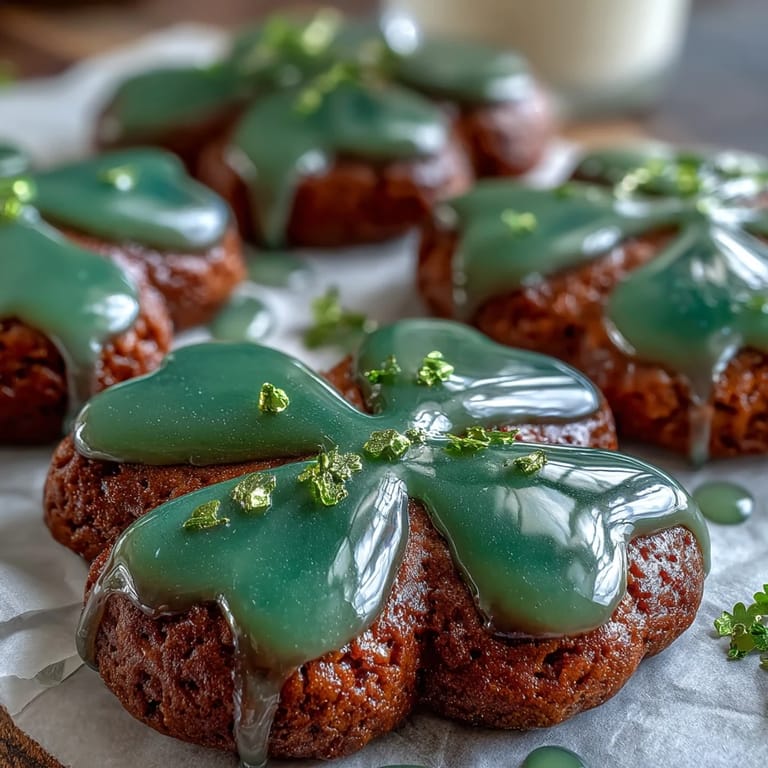
- Decorate with intention:
- Transfer icing to a piping bag fitted with a small round tip, outline each shamrock first, then fill the center by moving the piping bag in a back-and-forth motion. Let the icing set for at least 1 hour before stacking or serving so it hardens completely.
 Save to Pinterest
 The best part of making these cookies is the moment when someone takes a bite and their face lights up because they taste real butter and real vanilla, not just sugar. That's when you realize you've created something that goes beyond the holiday novelty.
Why These Cookies Stand Out
Most store-bought cookies taste the same year-round, but these feel intentional because you shaped them and decorated them yourself. The buttery dough has enough flavor to stand on its own even before the icing goes on, and the almond extract—if you use it—adds a sophisticated note that keeps people guessing what makes them taste different. The combination of texture and flavor makes these feel like you spent hours in the kitchen, even though the actual hands-on time is surprisingly short.
Decorating Like You Mean It
Royal icing has a reputation for being finicky, but it's really just about patience and understanding that beating it longer creates a smoother finish than adding more water. The first few shamrocks you pipe might look imperfect, but by the time you finish half a dozen, your hand finds its rhythm. If you mess up, remember that imperfect icing actually looks more homemade and charming than a flawlessly perfect result.
Storage and Keeping
These cookies stay fresh in an airtight container at room temperature for up to a week, though honestly they rarely last that long. The icing hardens enough that you can layer cookies with parchment between them without worrying about smudging. If you need to make them ahead, bake the plain cookies a couple days early and decorate the day before serving so the icing sets completely.
- Store cookies in an airtight container away from humid air so the icing stays crisp and doesn't soften.
- For softer cookies, reduce baking time by 1 minute so they stay chewy in the center.
- Edible gold glitter or sprinkles added to wet icing make these feel even more festive without extra effort.
 Save to Pinterest
 These shamrock cookies have become my go-to St. Patrick's Day offering because they're festive without feeling forced, and they taste like someone actually cared enough to make them from scratch. Every time I pipe the icing, I remember my neighbor's question and smile at how a simple kitchen conversation turned into a tradition.
Recipe Questions & Answers
- → What makes the cookies soft and tender?
Using softened butter and properly creaming it with sugar creates a tender texture. Chilling the dough helps control spread, maintaining softness while ensuring shape.
- → How do I achieve vibrant green icing?
Mix green gel food coloring into smooth royal icing until you reach the desired shade. Gel colors provide vibrant hues without thinning the icing.
- → Can almond extract be omitted?
Yes, almond extract is optional and can be left out if you prefer a more classic vanilla flavor or have nut allergies.
- → What is the best way to decorate the cookies?
Use a piping bag with a small round tip to outline and flood the cookies. Allow the icing to set completely, about an hour, before adding sprinkles or glitter.
- → How should the cookies be stored to retain freshness?
Store the decorated cookies in an airtight container at room temperature for up to one week to keep them fresh and maintain texture.